I have moved my posts from an old blog to this one and I have moved one month at a time.....I have been blogging far too long to post each one on a separate day. Enjoy the below post for the month mentioned in the tag line.
FRIDAY, OCTOBER 30, 2009
THURSDAY, OCTOBER 29, 2009
WEDNESDAY, OCTOBER 28, 2009
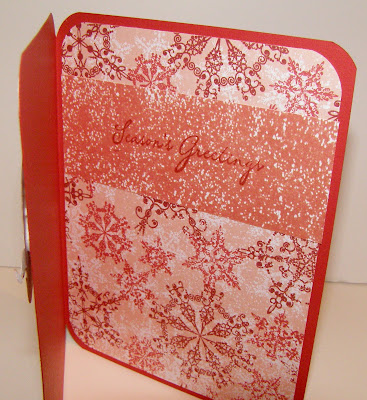
Got Snow?
 Simple card with ink and color.....but wait Dawn, how did you get those snowflakes embossed on that paper??
 With chipboard and a CUTTLEBUG die of course!!
So, I figured out a new trick with my CUTTLEBUG....not so much a new trick, because I have been cutting out chipboard with my dies for a long time...but gluing the chipboard to a piece of paper and running it through the CUTTLEBUG with my rubber mat....well, that was a new idea! So, since the chipboard cut with my CUTTLEBUG die is so perfect..why not create my own CUTTLEBUG embossing sheet?? I just cut out the snowflakes, arranged them on a 4x5.25 piece of cardstock and glued them down. Once dry, I placed the "new embossing sheet" that I created on the A and B plate of my C-Bug, the paper I wanted to emboss goes next, the rubber embossing mat, and then topped it off with the B plate and rolled it though. What I got was an embossed piece of paper with an un-embossed center for stamping. I can do this with all my dies!! Heart for Valentines, stars for birthday's...just imagine!!
I colored in my embossed areas with my cut -n-dry foam and some ink to highlight the raised areas. I then stamped some more snowflakes othe front (and no I did intend for the flakes to not be perfect...I just wanted a hint of snowflakes stamped on. A little Stickles for the snow effect and I was done! Now I have a template for future snowflake cards to emboss with!
TUESDAY, OCTOBER 27, 2009
Thanks a LATTE

Another easel fold card....I am having such fun with this!
 All my materials laid out for this one.
Go back a few posts to find the instructions for this fold if you haven't done one before. I basically did the same thing again, with some different paper and stamps this time! Embossing a slightly patterned piece of paper and then inking over it gives the background a different look. With the subtle color change in the patterned piece you get a nice look without all the work of distressing....even though I had to ink it up a little.
SUNDAY, OCTOBER 25, 2009
Spooky Halloween
 Ok, this hardly qualifies as truly "SPOOKY" with this adorable little ghost.
 Again, using leftovers from the page kit project I finished up this week..."BOO", the NEWEST Page KIT at PICTURE THIS in Eau Claire.....I made this cute little card for Halloween. You have GOT to love double sided paper when it comes to card making....you can't beat the matching ability of a small piece of paper...cut it up, flip it around...voila...card magic
SATURDAY, OCTOBER 24, 2009
Thank You card with flowers
 Hand cutting these cute flowers from the patterned paper isn't easy, but it make for easy embellishment matching when you are working with double sided papers...plus it is really economical to make your own embellies!
 Using up your leftovers is great too! There is always a little tiny piece of something left over from a project or two laying around here and since it is all coordinated....just put the pieces together for an easy card. The flower paper is still available at Picture This in Eau Claire, but I can't remember the name of it...I literally had only a tiny piece left to work with.....but look at the results!! The green dot circle on the inside of the card and the strip down the left edge of the front is the other side of the flower paper.
FRIDAY, OCTOBER 23, 2009
Thanks Thanks Thanks
 Another card with the easel fold....fun!
 I like making cards with different folds and shapes but I don't want them to be really complicated. This one is easy. See instructions here
Another card with a simple fold that gives your card a little different look. The whole card is made with cardstock except for the flower embellies, so it is economical too. Investing in my CUTTLEBUG MACHINE was the best tool purchase I have ever made. I use it BY FAR the most of all of the tools I own....so investing in Cuttlebug folders and dies and Spellbinders dies....well, it just makes sense!! A little embossing on a piece of cardstock makes such a huge difference when creating a beautiful card. Of course, you can purchase ALL these materials at Picture This is Eau Claire Wisconsin!!
THURSDAY, OCTOBER 22, 2009
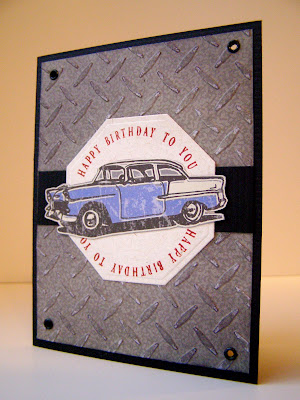
Happy Birthday to you

I AM Loving my Diamond Plate embossing folder right now!

I used a grey small dot print paper this time to create the background and then sanded off the high spots and then went back and rubbed in some black ink. The fact that my guys are totally into cars makes it easy to create a TON of car related cards with my Diamond Plate embossing folder from Provo Craft....available at PICTURE THIS in Eau Claire. Adding in my Octagon shape from Spellbinders Nestabilities was an easy choice too! The Demi Phrases from Just Rite made filling in the half circle around the hand cut car easy peasy too!
WEDNESDAY, OCTOBER 21, 2009
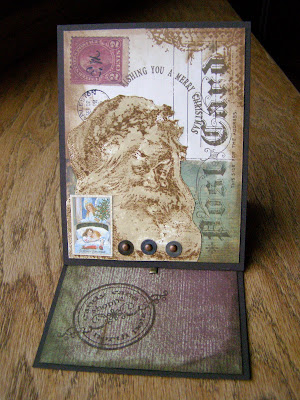
Vintage Santa and an Easel Fold

Stands up

Side view of the brad holding the top in place

Fully open where sentiment or a nice note can be written before sending

Folded flat for placing in the envelope and sending
I just had to try this new fold I have been seeing on the blogs and websites. Check it out for the pattern. The pattern does make a 4x4 card and I modified it to make a normal A2 size for regular envelopes (4 1/4X5 1/2").
After getting the pieces cut for the card the rest was a matter of layering and arranging my favorite goodies on the card. I have an awesome new stamp that I got from Stampers Anonymous (at Picture This, of course!!) and had to play. I also had to get out my awesome inks from Tim Holtz too! The background paper for the front of the card is actually part of a journaling print sheet. I trimmed it to work for the card front. I stamped out the images and then stamped out the santa on a different piece and cut it out and placed it in the corner. The green part of the postcard made Santa look ill..so I did the handcutting thing to make it look better. I loved getting out all my inks and things....super fun.
TUESDAY, OCTOBER 20, 2009
Fall notecard


You could easily put a sentiment in the upper right corner of the card before you sent the paper through the CUTTLEBUG. I used my craft sponge to rub on a little more color in the white area of the card with the MARMALADE and VINTAGE PHOTO inks. Buttons are attached with some Wacky Tack tape. You could put some thread through those to make them look like real attached buttons.
WEDNESDAY, OCTOBER 14, 2009
Candy Cane Christmas
 OK, the only candy cane in the card is the word, but it needs a title so I am going with that.
I have a ton of things going on with this one! I am usually partial to blue and white snowflakes, but these red ones were too beautiful to pass up....plus I got to play with my Tim Holtz Distress inks....
I took the corners off the card base this time, just to be different. A simple way to change things up when creating cards or even scrapbook pages. After cutting out the center die cut with my NESTABILITIES die I ran the middle part through the Cuttlebug to add some more snowflakes. I used my cut-n-dry foam to add the distress ink color. I also distressed the stamped image and the ticket. The Stickles was used to highlight the heart on the ticket. I used the pop-dots to raise up the stamped image on the front. Inside, the patterned paper is repeated with the double sided paper making it SOOOO easy to make it look like more work than it was.
If I keep creating a card a day I might have my Christmas cards done by early December...lol
By the way....the Inque Boutique stamp set I used is actually 50% off.....and we have a few sets left!!
TUESDAY, OCTOBER 13, 2009
Wishing you a Merry Christmas

 More playing this weekend. I took a bunch of different things and put them together for this one.
More simple layering with patterned papers and embellishments. I inked the edges of my papers and the bingo card to add a little more depth to the card. I stamped the word on the paper before I cut it out so I could see how big the circle I needed would be. After cutting it out I embossed it with the Cuttlebug folders and inked the whole thing with the same ink. I used the Stickles to "color" in the images I wanted and then mounted it all to the card base. the inside of the card also has some of the same patterned paper with a spot for the signature and sentiment.
MONDAY, OCTOBER 12, 2009
SUNDAY, OCTOBER 11, 2009
Baby Card
 I am sharing this card because it is adorable if I do say so myself. Everything EXCEPT the baby stickers can be purchased at PICTURE THIS. The main thing is the IDEA....you can use this idea with patterned paper cut into squares and mounted on cardstock and made to look like stamps. GRAPHIC45 has some AWESOME papers for Christmas that even have the "Stamp" look around the images in the patterned paper!!! Change the cardstock colors and you have a completely different card based on the same concept!
Since the stickers had an old fashioned distressed feel to them I followed that concept by distressing my cardstocks with brown inks. A little rub with a foam square (or sponge) and you can make the paper look older in a few seconds.
My background paper was a random piece of leftover yellow patterned paper with some blues and greens and reds kinda swished around the paper....no pattern really just color, but with some swipes of color from my inks and the little holes created by running it through my sewing machine, I made it look like it fit the theme. The rest is just layering and pop-dotting. I also used a piece of the patterned paper on the inside of the card too with a few more stickers (that are not available at the store)
SATURDAY, OCTOBER 10, 2009
Warm Winter Wishes

When I made this card,
I wasn't thinking that TODAY would snow
and winter would actually BE HERE!!

I thought this paper from Basic Grey looked like it would work for a potential Christmasy card. Nice greens and some pine bough looking twigs. With the "pine cone" and "warm winter wishes" stamps from A*Muse, they are perfect! I cut out and embossed the tag, inked the inside while the paper was still in the die and then stamped on my pine cone in the "hint of pesto" and the "warm winter wishes" in black right over the top. After that I layered the paper pieces and stuck the embossed tag right over the top with the pop-dot and my fake "ribbon" created with the Cuttlebug embossing and a piece of paper.
FRIDAY, OCTOBER 9, 2009
THURSDAY, OCTOBER 8, 2009
HI!

Another simple..."let the paper work for you" card
Again, a simple card using the patterned paper. The brown dots are the reverse side of the animal print....easy matching with that option! The green dot on the inside is another SEI print called tag. It has little elephants on it...super cute! What you can't see in the patterned paper is that some parts of the print has a glossy sheen to it...like the dots on the giraffes back and the birdie. You have to see that in person to appreciate it.
WEDNESDAY, OCTOBER 7, 2009
NUTS about you
 I'm back with a simple card using patterned paper...why not make it work FOR YOU?
Not much more needed for this than a simple stamp and a few punched butterflies. The little squirrel sitting in the trees is the top corner of this patterned paper, trimmed to size and placed on the card front and viola...a done deal. I used some of the paper from the bottom of the patterned paper piece to do the inside of the card and then used the border strip for the stripe!


